Topic: DMD0232
Making Effective Use of Programs
Programs are code-blocks that can be individually run as part of the current Do-more controller scan. Programs are the proper choice for typical ladder logic operations that involve timing, processing asynchronous instructions, handling ladder logic that takes multiple scans to complete, etc. A Program is required when Stage Programming instructions will be used.
The programmer controls when Programs are executed by using the Run Program (RUN) instruction. Once a Program has been started, it will run every controller scan until one of the following happens:
An Exit This Program (EXIT) instruction within the Program itself is executed
Another Program or Task executes a Halt Program or Task (HALT) instruction that targets the Program
Code-Block Configuration
Code-Block Configuration - each time that a new Program is created, the following dialog is automatically opened to setup the runtime configuration for that code-block:
Name - displays the name of the Program
Looping instructions in ladder logic (FOR / NEXT, WHILE / WEND, REPEAT / UNTIL, GOTO / LABEL) have the potential to cause problems during the controller's scan, ranging from variations in the scan times to infinite loops. Do-more controllers employ a mechanism - called 'yielding' - to manage this problem by allowing individual Programs to specify how much processor time per scan to allow looping instructions contained in the Program to execute before they 'yield'. When a Program yields it will suspend execution of a looping instruction during the current scan, and will begin executing the looping instruction on the next scan, taking up right where it yielded. The amount of time allotted for loop execution in a Program is called the TimeSlice and the value is stored in the .TimeSlice field of each Program's structure.
The Program's .TimeSlice value will be set to this Initial TimeSlice value on every PROGRAM mode -to- RUN mode change. The Program's TimeSlice value can be changed at runtime by modifying the .TimeSlice structure member.
Never Yield (except at YIELD instruction) - selecting this option will cause the Program to run to completion. This selection will cause each loop to complete each time the code-block is executed. The only exception is if the Program contains an explicit Yield Program or Task (YIELD) instruction.
Note: This selection will cause the loops to complete in the least amount of time possible, but has the most potential to vary the scan time.
Note: Selecting 'Never Yield' results in a .TimeSlice value of 65535

Always Yield at each "yielding" instruction - selecting this option will cause the Program to stop execution on each scan at each yielding instruction in the Program. "Yielding" instructions include Index by Step (NEXT), While End (WEND), Repeat Until Condition is Non-Zero (UNTIL), and Yield Program or Task (YIELD).
Note: Selecting 'Always Yield' results in a .TimeSlice value of 0
Yield Every XXX microseconds - selecting this option will cause the Program to execute the looping instructions for the user-specified amount of time, then yield once a yielding instruction is reached. This value can be any integer constant between 1 and 65534.
Code-Block Protection deals with accessibility and visibility issues for a Program code-block by allowing the programmer to secure the contents of user-created code-blocks from being viewed and/or from being edited by means of a password and encrypting the code-block contents. This dialog will show the current state of the protection and allow the programmer to set the protection level that will be enforced once the dialog is closed or the project is closed.
Full Access - (the default value) - the contents of the code-block can be viewed and modified without restriction.
Unlocked for this Project Session - the code-block is password protected, and once the password is correctly entered it's contents can be viewed and modified. The code-block will be locked automatically after the project session is closed.
Locked
- the code-block name will be listed in the Control Logic group, and placeholders
for each rung will be present, but the contents of the
Note:
the contents of
Click Set Protection Level to save the protection level changes.
Click Cancel to exit without saving any protection level changes.

Set Password - click this button to invoke the Modify Code-Block Password dialog. Code-block passwords must be at least 4 characters in length, can be any reasonable length, and can contain any combination of letters, numbers, and characters.
Current Password - will be disabled if no password currently exists, otherwise enter the current password for this code-block.
New Password - enter the new password for this code-block
Confirm New Password - re-enter the password to confirm
Click Clear Password to clear the existing password.
Click Set Password to save the new password. Note: it is imperative that the programmer remember the code-block password. Once a password has been set for a code-block it is encrpyted as part of the code-block, and therefore it will be impossible to retrieve a lost code-block password.
Click Cancel to exit without saving the new password.

Program Structure Members
Each Program in a Do-more project contains a structure that provides status information and control options for the Program that are programmatically accessible. The values in the structure are updated each time scan that the Program runs. The syntax for using them is <program name>.<field name>.
.Running - a read-only Bit location that indicates whether the Program is currently running
is ON if the Program is running
is OFF if the Program is not running
.RanThisScan - a read-only Bit location that indicates whether the Program ran as part of the current controller scan
is ON if the Program ran on the current scan
is OFF if the Program did not run on the current scan
.Done - a read-only Bit location that shows whether the Program has completed
is ON if the Program has run to completion
is OFF if the Program is currently running or has never Run
.FirstScan - a read-only Bit location that indicates whether this is the Program's first scan after a PROGRAM -to- RUN transition
is ON if the Program is executing it's first scan
is OFF if the Program has completed it's first scan
.FirstRun - a read-only Bit location that indicates whether the Program has completed one full pass through all of it's ladder code after a PROGRAM -to- RUN transition
is ON if the Program is still executing it's first full pass
is OFF if the Program has completed it's first full pass or has never been run
Note: if the Program contains looping instructions (FOR / NEXT, WHILE / WEND, REPEAT / UNTIL, GOTO / LABEL) the program's first run may take multiple controller scans to complete.
.DoneThisScan - a read-only Bit location that indicates whether the Program has executed the final rung of ladder logic in the Program
is ON if the Program stopped on the current scan
is OFF if the Program did not stop execution on the current scan
.InstrSuspend - a read-only Bit location that indicates the Program is currently being suspended by a Suspend Program or Task (SUSPEND) instruction.
is ON if the Program is suspended by a SUSPEND instruction
is OFF if the Program is not suspended by a SUSPEND instruction
.DebugSuspend - a read-only Bit location that the Program is currently being suspended by a Debug View operation - a Program that is suspended will also have a yellow background in the Project Browser.
is ON if the Program is suspended by a debug operation
is OFF if the Program is suspended by a debug operation
.TimeSlice - a read-only, unsigned
32-bit location that contains the amount of time (in microseconds) per
controller scan to allow Programs containing any looping instructions
to run.
.ScanCounter - a read-only, signed 32-bit location that contains the number of controller scans during which the Program has run. This value is reset to 0 when the Program is first run and will retain the last value until the Program is stopped and set to run again.
.RunCounter - a read-only, signed 32-bit location that contains the number of times the Program has run to completion. This value is reset to 0 when the Program is first run and will retain the last value until the Program is stopped and set to run again.
Note: If there are no looping constructs (For / Next, While / Wend, Repeat / Until, Goto / Label) the .RunCounter value and the .ScanCounter value will be the same.
Active Stages - contains 2 different
representations of the Enabled/Disabled status of the Stages in the Program.
.S0_15 through .S112_127 - 8 consecutive read-only, unsigned 16-bit locations, each location contains the Enabled/Disabled status for 16 consecutive Stages
.S0 through .S127 - 128 consecutive read-only, bit locations that contain the Enabled/Disabled status for all of the Stages in the Program
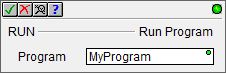
Run Program (RUN) instruction
The Run Program (RUN) instruction is used to run a user-defined Program or a system Program.
This instruction does NOT cause the controller to immediately begin execution of the Program, rather it configures the Program to run when the controller gets to it as part of it's normal scan. If the Program exists later in the execution order the Program will begin execution on the same PLC scan. If the Program exists earlier in the execution order the Program will begin execution on the subsequent scan.
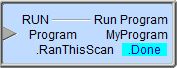
The gray triangle at the right end of an input leg indicates the input
is edge
triggered
The following fields will be displayed in the status display:
.RanThisScan - will be ON if the Program ran on the current scan and OFF if the Program did not run on the current scan
.Done - will be ON if the Program has run to completion and will be OFF if the Program is currently running or has never run
Stage Programming in Program Code-blocks
A Program is required if any of the Stage Programming instructions or any Fully Asynchronous instructions configured to Jump To Stage will be used. Each Program code-block can have up to 128 stages. For Example, $Main is a Program, so it can have up to 128 stages, named $Main.S0 through $Main.S127 (decimal). A separate Program called MonitorAlarms can also have up to 128 of it's own stages, named MonitorAlarms.S0 through MonitorAlarms.S127. Each Program’s stage bits are contained within that program’s structure memory.
Stage Programming Instructions:
The following list of instructions are classified as Fully Asynchronous which means the instruction is dependent on a shared device to complete the operation. When the instruction is executed it will lock the device to gain exclusive use of that device while the instruction is being processed across multiple scans. When the instruction is completed it will unlock the device so that the device can be used by the next instruction that needs it. These instructions can be configured to "Jump to a Stage" when they are done, so if configured in this way, these instructions must be placed in a Program (not a Task).
Fully Asynchronous Instructions:
Networking Instructions
String Instructions
Device Instructions
CTRIO / CTRIO2 Instructions
CTRIO2 Only Instructions
Calendar Instructions
Beyond using Programs to modularize a ladder logic program, and help with segmenting the ladder logic into functional blocks that can be enabled and./or disabled, utilizing the Program related instructions can help tailor the Project's execution to better fit the application.
Using the Yield Program or Task (YIELD) instruction
Suppose, for example, that the most pressing need is to minimize the scan time of the controller. If the Program has ladder logic that does not need to run every scan, one or more Yield Program or Task (YIELD) instructions can be embedded in the Program. YIELD instructions will cause the Program to suspend execution at that point in the Program, and return to processing to the next project element (this could be the next Program or the main ladder logic section). The next scan this Program is run, processing will begin when right after the YIELD instruction that was last executed. Refer to the following pseudo-code:
Program Start
Ladder Code
Ladder Code
Yield
Ladder Code
Yield
Ladder Code
Ladder Code
Program End
This process of segmenting the Program into subsections that will be run on subsequent executions allows the controller to process fewer instructions per scan, which keeps the scan time as low as possible. Of course it is the responsibility of the developer to decide where to place the YIELD instructions so that the application still functions and the scan time is minimized.
Managing Looping Instructions within Programs
Inside a Program you can use looping instructions (FOR / NEXT, WHILE / WEND, REPEAT / UNTIL, GOTO / LABEL) that will process the ladder logic instructions inside the loop as long as the input condition is TRUE. Using a loop in a Program brings with it the potential to cause the scan time to get really long, or if something goes really wrong, it can cause the CPU's watchdog timer to fire. So in order to prevent this from happening, each Program has a .TimeSlice value that defines the amount of processing time (in microseconds) to allow a Program to process looping instructions before it yields to other processes.
As discussed above, the Program's .TimeSlice value will be set to it's Initial TimeSlice value on a STOP mode -to- RUN mode change. Refer to the following pseudo-code:
Program Start
Ladder Code
Ladder Code
While condition is true
Ladder Code
Ladder Code
Wend
Ladder Code
Ladder Code
Program End
Setting the .TimeSlice value at 0 effectively means the Program will make one pass through the loop each time the Program is allowed to run.
To allow the loop to run more than once per pass through the Program, set the .TimeSlice structure member to the number of micro-seconds to allow the Program to run, up to a maximum value of 65534 micro-seconds.
To allow the loop to complete in one scan, set the .TimeSlice structure member to the 65535 micro-seconds.
Using Restart Program or Task (RESTART)
Another way to further control the processing of a Program is through the Restart Program or Task (RESTART) instruction. If a Program containing one or more YIELD instructions has been allowed to run at least once so that the execution pointer - that is where the Program will begin executing when it is allowed to run again - is not at the beginning of the Program, you can use the Restart Program or Task (RESTART) instruction to reset the execution pointer (and the Program's flags) so that the next time the Program is allowed to run, it will begin at the first rung of the Program instead of at the point of the last YIELD instruction.
Program Start
Ladder Code
Ladder Code
Yield
Ladder Code
Yield
Restart Program or Task (RESTART) was executed after this Yield was executed, so Program was terminated and the execution pointer was reset to the first instruction in this Program, so the following two rungs were not processed.
Ladder Code
Ladder Code
Program End
Note: The Halt Program or Task (HALT) instruction is used to stop the execution of a Program without setting it to restart on the next scan.
Using Exit This Program (EXIT)
Control of the processing of a Program can also be done through the optional EXIT This Program (EXIT) instruction. This instruction provides a way to have multiple exit points for a given Program.
Program Start
Ladder Code
Ladder Code
If Condition 1 then Exit This Program
Ladder Code
If Condition 2 then Exit This Program
Ladder Code
Program End
Data View Display Formats:
There are 4 variations of the Data View display of a Program, each with different amounts of data and/or different display orientations.
Note: These formats are for display purposes only, the Run Program variables cannot be edited when displayed using any of the formats.
Short Single Line:

Short Multi-Line (the default)

Long Single Line:

Long Multi-Line:

See Also:
Making Effective Use of Programs
Related Topics:
Related Instruction Topics: